Circuit diagram:
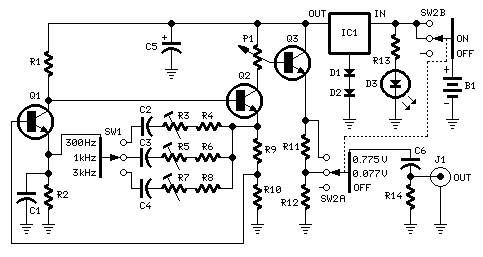
Parts:
P1_______________4K7  Linear Potentiometer

R1______________12K  1/4W Resistor
R2_______________2K2 1/4W Resistor
R3,R5,R7_________1K  1/2W Trimmers (Cermet)
R4,R6____________1K5 1/4W Resistors
R8_______________1K  1/4W Resistor
R9_______________4K7 1/4W Resistor
R10______________3K3 1/4W Resistor
R11______________2K7 1/4W Resistor
R12____________300R  1/4W Resistor
R13______________1K  1/4W Resistor (Optional)
R14____________100K  1/4W Resistor

C1______________22nF  63V Polyester Capacitor
C2_______________3µ3  63V Polyester Capacitor
C3,C6__________330nF  63V Polyester Capacitors
C4______________56nF  63V Polyester Capacitor
C5______________22µF  25V Electrolytic Capacitor

D1,D2_________1N4148  75V 150mA Diodes
D3_______________3mm  Red LED (Optional)

Q1,Q2,Q3_______BC550C 45V 100mA Low noise High gain NPN Transistors

IC1____________78L05   5V 100mA Regulator IC

J1_______________RCA  Audio output or 3mm or 6.3mm Mono Jack sockets

SW1________________1 pole  3 ways Rotary or Slider Switch
SW2________________2 poles 3 ways Rotary or Slider Switch

B1________________9V  PP3 Battery

Clip for PP3 Battery
Comments:
This circuit was designed to provide a valuable test equipment tool for sound reinforcement systems like guitar amplifiers and the like. Used in conjunction with an ac voltmeter or other ac measurement tools, it can be of considerable help in setting and controlling levels through any amplifying chain.
Please see the Precision Audio Millivoltmeter, Peak Level Indicator and Three-level Audio Power Indicator designs, all available on this website, to complete the equipment.
The circuit is based on a simple, two-transistor oscillator circuit, featuring very high frequency and amplitude stability but avoiding thermistors, bulbs or any special amplitude-limiting device.
Three different output frequencies, namely: 300Hz, 1KHz and 3KHz, are provided by switching SW1.
The sine wave output amplitude can be varied continuously (by means of P1) in two ranges: 0 - 77.5mV RMS (219.7mV peak-to-peak) and 0 - 0.775V RMS (2.191V peak-to-peak).
A regulated supply is necessary to obtain a stable output waveform. D1 and D2 force IC1 to deliver 6.2V output instead of the nominal 5V.
Notes:
- THD at maximum output voltage: 0.11% @ 1KHz, 0.23% @ 300Hz, 0.05% @ 3KHz.
- Total current drawing (LED pilot light omitted): about 4.5mA.
- D3 LED pilot light and its current limiting resistor R13 are optional.
Circuit set-up using an oscilloscope:
Connect the oscilloscope to J1, rotate P1 fully clockwise and switch SW2 to 0.775V position.
Adjust R3, R5 and R7, after switching SW1 to the correspondent position, to obtain output sine waves having 2.2V peak-to-peak amplitude.
"By ear" circuit set-up:
Connect an amplifier to J1, switch SW2 to 0.775V position and rotate P1 and the amplifier controls to obtain a moderate output sound level.
Carefully adjust R3, R5 and R7, after switching SW1 to the correspondent position, until the output sound will stop; then turn back the trimmer very slowly and stop adjusting immediately when the sound will start again.