Circuit diagram:
Parts:
R1_______________2K2 1/4W Resistor
R2______________10M  1/4W Resistor
R3_____________100K  1/4W Resistor
R4,R5__________330K  1/4W Resistors
R6,R7,R8_______100K  1/2W Cermet or Carbon Trimmers

C1,C2,C3_______220nF  63V Polyester Capacitors
C4,C8__________100nF  63V Polyester Capacitors
C5______________10nF  63V Polyester Capacitor
C6_______________1nF  63V Polyester Capacitor
C7_____________100µF  25V Electrolytic Capacitor

IC1____________4011  Quad 2 input NAND Gate CMos IC
IC2___________78L06    6V 100mA Regulator IC

D1___________1N4148   75V 150mA Diode

Q1____________BC547   45V 100mA NPN Transistor

SW1____________2 poles 3 ways Rotary Switch
SW2____________SPST  Toggle or Slide Switch

B1_______________9V  PP3 Battery

Clip for PP3 Battery
Circuit operation:
A digital voltmeter or (with a bit less precision) an analog one, can be used for frequency measurements up to 200kHz using this circuit. The design is based on an original idea of Rae Perälä, Helsinky, Finland.
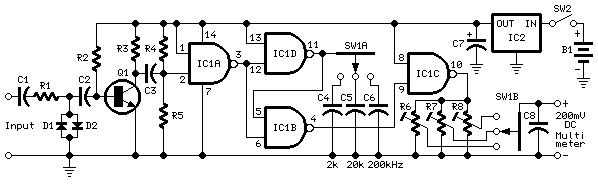
The frequency to be measured is amplified by Q1, but the input signal is limited to a maximum of about 2V peak-to-peak by R1, D1 and D2.
The ac input of the logic gate IC1A is biased towards the switching point by resistors R4 and R5. In this way, the gate switches at a significantly lower input voltage than would otherwise be needed and changes its output voltage each time the input voltage passes the half supply voltage threshold.
IC1A controls gates IC1B and IC1D. Gate IC1D output voltage is reversed and delayed by a capacitor (C4, C5 or C6) relative to gate IC1A's output. One input of gate IC1B is fed with the output voltage of IC1A and in the other input with the delayed voltage from gate IC1D. Output of gate IC1B comprises a negative pulse with a duration equal to the time it takes for gate IC1D to falling from its high state to its low state. Pulses from gate IC1B are then inverted in gate IC1C. These pulses are always similar in shape, independent of the amplitude and shape of the original input voltage.
The mean value of gate IC1C's output voltage can then be measured by a digital multimeter with its 200mV dc voltage range selected.
Three frequency measuring ranges (2kHz, 20kHz and 200kHz) are selected by SW1A, which connects a suitable capacitor to gate IC1D's output, and SW1B which in turn connects a trimmer for each range to gate IC1C's output.
In this way the meter reading can be adjusted so that the voltage reading directly represents the unknown input frequency.
The circuit requires a 6V regulated power supply, obtained from IC2 and a 9V battery, with a total current drawing of 2.5mA.
Circuit Calibration:
The circuit can be easily calibrated using tones of known frequency, centered for each range at 1kHz, 10kHz and 100kHz respectively. These tones can be easily obtained from sine or square wave generators, computer software (many free or shareware programs: simply type "tone generator software" on Google), or directly downloaded from the web as sound files of the desired frequency (type "audio tone files" or "test tone files" on Google).
With the multimeter set to 200mV dc and an input signal of 1kHz, trim R6 to read 1000. Common 3 1/2 digits multimeters will display 100.0 but please forget the point.
Trim R7 to read always 1000 with an input signal of 10kHz: in this case, the least significant digit of 10000 is not displayed but even in this range forget the point.
Trim R8 to read 100.0 with an input signal of 100kHz: in this range the point is displayed correctly.
Technical data:
- Input Sensitivity:
- 2.5mV RMS from 100Hz to 20kHz
- 7mV RMS at 100kHz
- 10mV RMS at 15Hz and 200kHz
- Total Current Drawing:
- 2.5mA
Note:
- If an input sensitivity of about 280mV RMS is considered sufficient, Q1, R2, R3 and C2 can be omitted and the junction of R1, D1 and D2 can be connected to C3.